Acid-filled runway


Contributors to Wikitroid

Article Images


The "acid-filled runway" is a room in Kraid's Lair/Kraid. It appears, with significant differences between versions, in Metroid and Metroid: Zero Mission.

In both games, this is a dead-end corridor accessible from the right side of the entrance shaft.

In Metroid, the corridor is constructed from multiple tilesets, including blue and circular near the entrance and white and black near the end. The initial room is a square chamber with three midair platforms and a pool of acid below, from which an infinite stream of Geegas spawns. There are two passages in the large wall to the right that lead to a secret second half of the chamber, with another small acid pool and three midair pillars above. An Energy Tank is found in between the pillars, in plain view. As is typical of item corridors, the ceiling above the item itself is made of small white tiles.

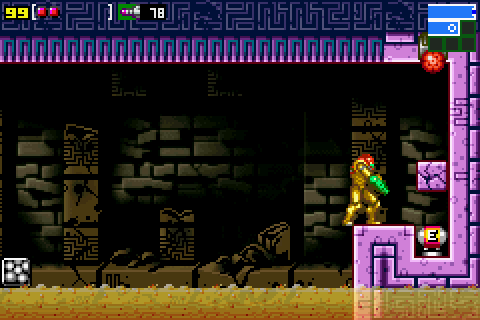
In Zero Mission, this room's appearance has been significantly changed. It can be accessed at any time, but the Energy Tank cannot now be obtained without the Speed Booster as it is covered by a Boost Block barrier. Similar to other rooms in the redesigned Kraid area, decaying ruins and large cactus-like plants can be seen in the background. Acid fills the entire room, including under dry land, although it is not dangerous if Samus has the Varia Suit. To collect it, Samus must start running from the entrance to the room until her Speed Booster activates. She will run down a slight incline and across a bridge of Pit Blocks over the acid, and must quickly Spin Jump off the bridge. If successful, she will penetrate the Boost Blocks and collect the tank. She can also Shinespark to the right from the top of the incline. Four Reos are found above the bridge and will swarm Samus as she moves, but they are easily killed by the Speed Booster. After obtaining the tank, Samus can shoot a red button above her to call a zip line to her side, and ride it back to dry land.

Metroid

Zero Mission

Energy Tank
See above.

Metroid Prime: The Official Nintendo Player's Guide

012 BIG WALL, SMALL PASSAGE (pg. 131)
"The second corridor on the right ends abruptly with a thick, blue wall. When you stand on the ledge that extends from the wall and fire your Wave Beam to the right, you'll break a series of blocks and expose a tight passage that runs through the wall. Roll up and use a Bomb to blast yourself up to the height of the passage. Then roll to the right and collect an Energy Tank."

Metroid: Zero Mission: The Official Nintendo Player's Guide

106 energy tank (pg. 45)
"Speed is the key to collecting the lair's Energy Tank. Start running as soon as you enter the corridor. The Speed Booster will charge up as you reach the breakaway blocks. When you arrive at the end of the runway, jump. You'll fly into a wall of blocks that break under the influence of the Speed Booster, and you'll gain access to the tank."
012 BIG WALL, SMALL PASSAGE (pg. 108)
"The second corridor on the right ends abruptly with a thick blue wall. When you stand on the ledge that extends from the wall and fire your beam to the right, you'll break a block and expose a passage that runs through the wall. Roll up and use a bomb to blast yourself up into the passage. Then roll to the right and collect an Energy Tank."

Rooms on Zebes
Brinstar Corridor No. 1 • "Fake Block shaft" • "Overhang corridor" • Blue-tinted shaft • "Long Beam corridor"
Corridor No. 2Entrance to TourianGold-colored shaftCorridor No. 5 • "Transport to Norfair"
Corridor No. 3Corridor-connecting room • "Varia Suit corridor" • "Brinstar end shaft"
"Bomb access corridor" • "Brinstar Bomb room" • Corridor No. 4
Kraid Elevator • "Hidden tank shaft"

Corridor No. 1 • "Fake Block shaft" • "Overhang corridor"
"Green Brinstar Main Shaft‏" • "Dachora's room" • "Pink shaft" • "Spore Spawn Room"
"Super Missile drop" • "Early Supers Room" • "Jungle slope" • "n00b bridge"
"Red Tower" • "Transport to Norfair" • "Mini-Kraid's room" • "Kraid's room access" • Kraid's room
"Kraid's reliquary" • "Red Tower Elevator Room" • "Alpha Power Bomb Room"
"Red Brinstar Fireflea Room" • "X-Ray Scope room" • "Jungle trap" • Hell

Norfair Brinstar-to-Norfair elevator shaft • "Western lava-filled path" • "Transport to Crateria"
"Missile Tank tunnel" • "Norfair main corridor" • Blue-bubble shaft • "Ice Beam access corridor"
"Ice Beam room" • "Long bubble shaft" • Norfair's upper-right path • "Heated Missile corridor"
"Norfair's gauntlet" • "Hi-Jump access corridor" • "Hi-Jump room" • "Superheated runway"
"Brutal path" • "East green bubble shaft" • "Screw Attack corridor" • "Three rock corridor"
"Twin hill corridor‏‎" • "Precarious path" • "Fire-Sea Room" • "West green bubble shaft"
Hopping-Mad Corridor • "Dual tank chamber" • "Vine-infested passage‏‎"
"Single-block-wide bridge" • "Wave Beam access corridor" • Path of Destruction
"Kiru Giru larva hall‏‎" • "Path of vines‏" • "Kiru Giru's room" • Ridley Elevator
"Broken Statue room" • Lava-filled passage

"Norfair entrance shaft" • "Hi-Jump room" • "Bubble Mountain" • "Speed Booster Hall"
Long horizontal path • "Ice Beam Gate Room" • Pirate-infested corridorCroc's pit
"Norfair Jump Room" • Grapple Crossing • "Lava Dive Room"

Kraid's Lair "Kraid entrance shaft" • "Barisute pit" • "Caged Sidehopper hall" • "Apex launcher shaft"
"Kraid's highest corridor" • "Zeela-infested shaft" • "Chozo machine hall" • "Acid Worm's room"
"Acidic concourse" • Bottomless Pond • "Mini-Kraid's room" • "Ball launcher speedway"
"Acid-filled runway" • "Kraid's gauntlet" • "Kraid's slope" • "Kraid's room access"
Kraid's room • "Kraid's reliquary" • "Block column shaft" • "Acid fall"
"Corrosive pool"
Ridley's Lair Eerie Cave • "Cocoon cavern" • Imago's hideout • "Hall of pillars" • Artificial Passage
"Path over lava" • "Shaft of doom" • "Ridley's maze" • Zebbo Nest • "Ridley's rightmost shaft"
"Chain reaction chamber" • "Ridley's runway" • Middle corridorMultiviola Nest • "Gambit shaft"
"Ridley's room access" • Ridley's room • "Ridley's reliquary" • "Ridley's shortcut"

Lava room • "Acid Statue Room" • Golden Torizo's chamberLava LakeRidley's room • "Lower Norfair Fireflea Room"

Tourian "Tourian entrance shaft" • "Tourian lava passage" • "Tourian ledged shaft" • Triple-tiered room
"Rinka hall" • Zebesian Command Center • "Tourian escape shaft"

"Tourian entrance shaft" • "Big Metroid's room" • Zebesian Command Center

Crateria "Crateria's undershaft" • Flooded cavern • "Chozo Ruins main cavern" • Water-filled hole
"Statuary shaft" • "Chozo reliquary" • "Crateria Chozo Ruins entrance"
Landing Site • "Crateria tube" • Rocky cave • "Weed-filled hall" • "Transport to Brinstar" • "Wrecked Ship entrance"

Landing SiteRocky cave • "Tourian escape shaft" • Zebesian Command Center
"Pre-Map Flyway" • "Crateria Map Station" • "Torizo's chamber" • "Crateria Missile cache"
"Crateria's undershaft" • "Crateria tube" • "Interior Lake" • Flooded cavern • "Old Tourian launchpad"
"Crateria Chozo Ruins entrance" • "The Gauntlet" • "Statues Hallway" • Mysterious Statue Chamber

Wrecked Ship "Wrecked Ship entrance" • "Wrecked Ship Main Shaft" • Phantoon's chamberTop corridor
"Walking Chozo chamber"
Maridia "Glass Tunnel" • "Maridia Main Shaft" • "Mount Death" • "Tatori's room" • "Aqueduct"
"Botwoon's chamber" • "Shaktool Chamber" • Draygon's chamber • "Plasma Spark Room" • "Plasma Chamber"
Chozodia "Mother Ship landing site" • "Mother Ship entrance" • "Mother Ship's first chamber" • "Tripwire corridor"
Escape-ship bay • "Hangar Shaft" • "Cracked surface shaft" • Laser room
Ship's large glass tube • "Chozodia's fork" • "Pitfall" • "Zebesian pit" • "Chacmool room"
"Chozo Shaft East" • "Chozo inner temple" • Flooded chamberTop of the ruins
"Chozodia lava pool" • Probe-packed corridor • "Mother Ship armory" • Ship's last chamber
Other rooms Metroid: BrinstarKraid's LairNorfairRidley's LairTourian
Metroid: Zero Mission: BrinstarNorfairCrateriaChozodiaKraidRidleyTourian
Super Metroid: CrateriaBrinstarNorfairWrecked ShipMaridiaTourian

More Information

Top Contributors

RoyboyX

Community content is available under CC-BY-SA unless otherwise noted.